Template:Ratings
Escape intact as Covenant forces board your ship.
|
The Pillar of Autumn is the first level in the campaign mode of Halo: Combat Evolved in the Halo Trilogy. As the Master Chief, you must make your way to the bridge of the titular ship, then find your way off the ship. Your allies are Marines and the PoA's crew.
This level is modified depending on the difficulty chosen. S.Sgt. Johnson makes different speeches at the beginning of the level, one for each difficulty. In Easy and Normal, the player goes through a testing diagnostic showing the bare basics of controls. In Heroic and Legendary difficulty, it is automatically skipped and the player immediately heads out to find Captain Keyes. In Easy and Normal difficulty, the motion sensor and grenades are disabled until certain moments in the level. On Heroic and Legendary, they can be used right from the start.
Allies
- Humans
- Captain Keyes
- Marines
- Naval Crewmen
- AI
- Cortana
Enemies
Weapons
- Pistol
- Assault Rifle
- Plasma Pistol
- Plasma Rifle
- Fragmentation Grenade
- Plasma Grenade
Vehicles
- Warthog (Cutscene only)
- Pelican (Cutscene only)
- Scorpion (Cutscene only)
- Boarding Craft (Non-drivable)
- Longsword (Cutscene only)
- Bumblebee (Non-drivable)
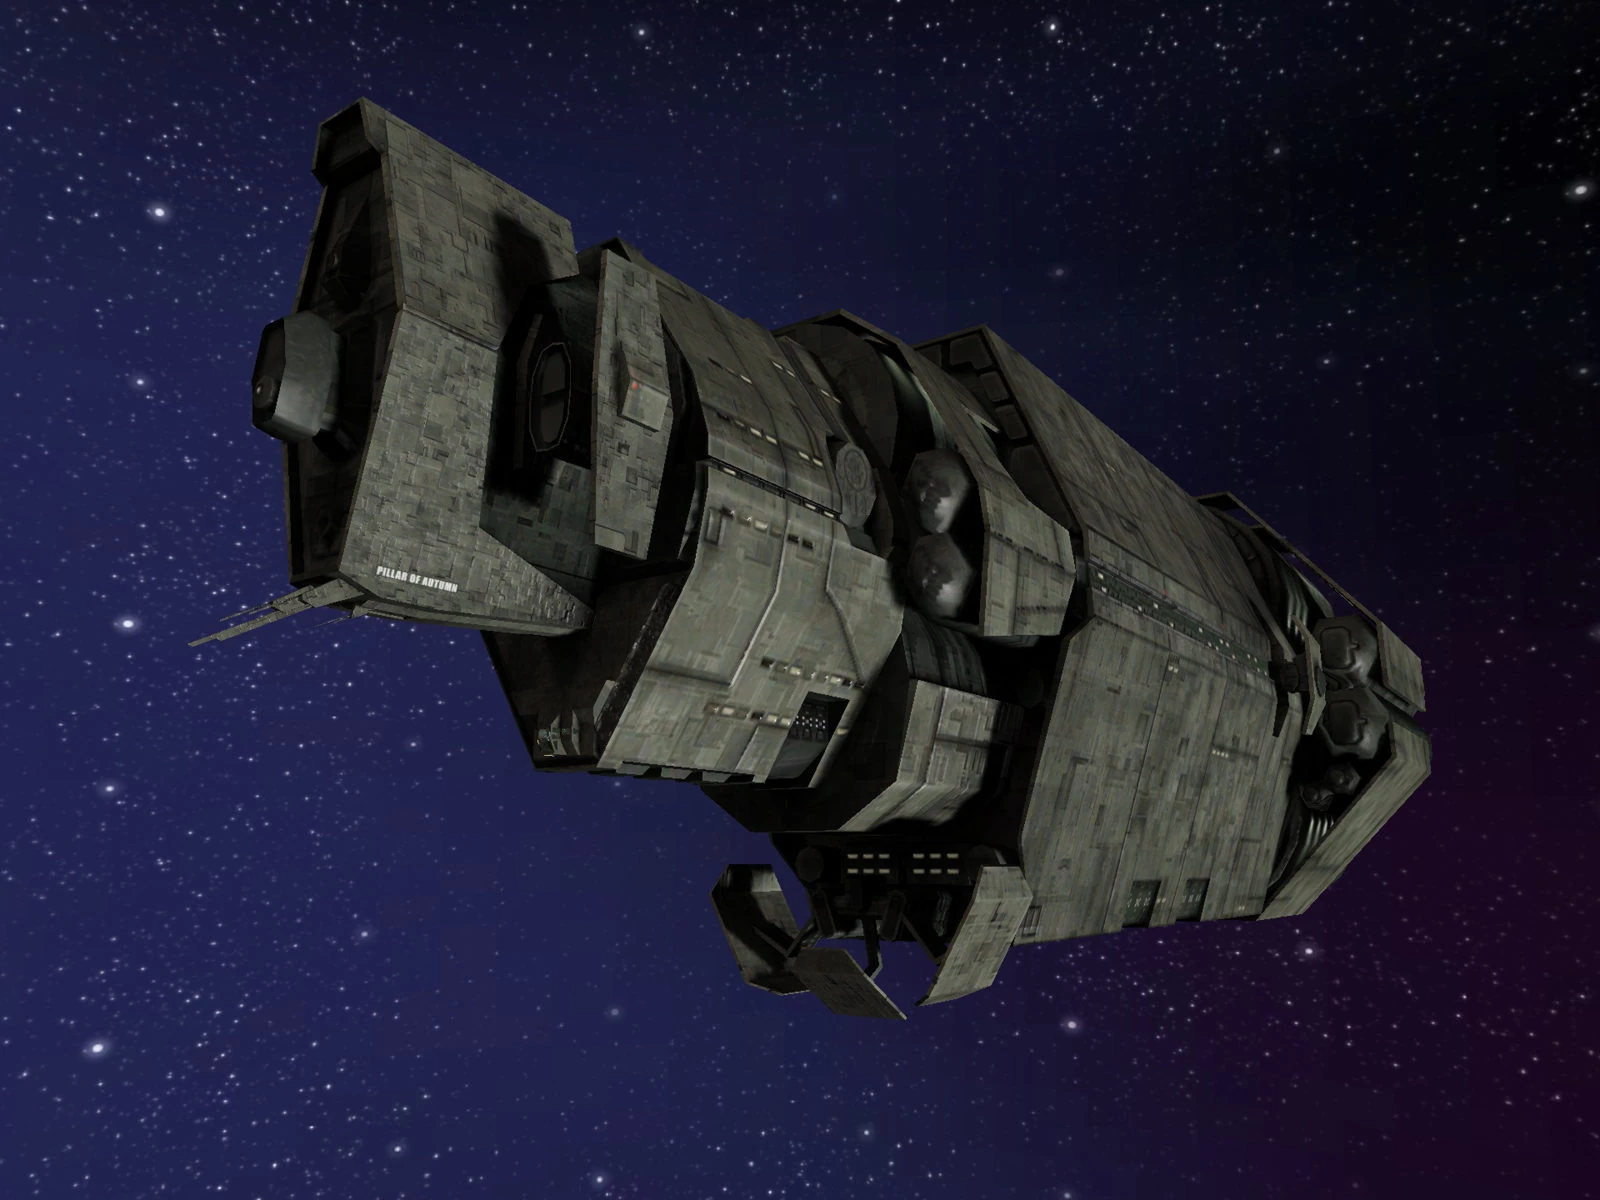
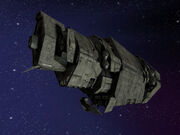
- Pillar of Autumn (Non-drivable)
Equipment
Mission Objectives
- Complete training diagnostics
- Find Captain Keyes on the Bridge
- Get off the Pillar of Autumn
Bonus Objectives
- Find the Megg
Transcript
Part 01: The Pillar of Autumn
The UNSC Pillar of Autumn.
{Fades into space; Halo is visible above Threshold}
{Slowly turns and zooms in onto the Pillar of Autumn Longswords soar along side}
Captain Keyes: "Cortana, all I need to know is did we lose them?"
Cortana: "I think we both know the answer to that."
{Inside ship, where the view focuses on the Captain}
Captain Keyes: {sighs} "We made a blind jump, how did they--"
Cortana: <interrupting> "Get here first? The Covenant ships have always been faster. As for tracking us all the way from Reach, at light speed, my maneuvering options were limited."
The Captain begins pacing around, looking at screens
Captain Keyes: "We were running dark, yes?
Cortana: "Until we decelerated. No one could have missed the hole we tore in subspace."
A Pause occurs, as the captain looks at a crewman's screen.
Cortana: "They were waiting for us on the far side of the planet."
Crewman presses some buttons, make beeping sound.
Captain Keyes: "So, where do we stand?"
Cortana: "Our fighters are mopping up the last of their recon picket now, nothing serious. But, I've isolated approach signatures from multiple CCS-class battle groups, make it 3 capital ships per group. And in about 90 seconds they'll be all over us."
Captain Keyes: "Well that's it then. Bring the ship back up to combat alert alpha. I want everyone at their stations."
Cortana: "Everyone, sir?"
Captain Keyes: "Everyone."
{Everyone on board run towards their stations}
Captain Keyes: "And Cortana?"
{Cortana's avatar appears}
Cortana: "Hmm?"
Captain Keyes: "Let's give our old friend a warm welcome."
Cortana: "I've already begun."
{Brothers In Arms by Martin O'Donnell from the Halo: CE original soundtrack starts playing.}
{Cuts to the main hold of the Pillar of Autumn, A Marine waves light Batons to guide a Pelican into a correct position. The view moves towards the lower deck.}
Cortana: (O.S.) "Attention: All combat personnel, please report to your action stations."
Cortana: (O.S.) "5th platoon, secure airlocks on Deck 11. 14th platoon, rendezvous with 22nd tactical at bulkhead Charlie 14."
(Marines start talking, readying their weapons, preparing Tanks and Warthogs, or just loitering, until the view shows a Sergeant, known as Avery Johnson walking through a line of Marines.)
Sergeant Johnson: "You heard the lady! Move like you've got a purpose!"
Cortana: (O.S.) "This is not a drill. I repeat, this is not a drill."
{Following dialogue varies depending on game difficulty.}
(Marines step into two standard military rows facing each other. Johnson walks down the column between the rows)
Sergeant Johnson (Easy): "Men...keep your eyes downrange, fingers on your triggers, and we all go home in one piece." {Turns around} "Am I right Marines?!"
Sergeant Johnson (Normal): "Once again, it is our job to finish what the flyboys started. We are leaving this ship platoon, and engaging the Covenant on solid ground. When we meet the enemy, we will rip their skulls from their spines, and toss 'em away, laughin'!" {Turns around} "Am I right, Marines?"
Sergeant Johnson (Heroic): "Men, here is where we show those split-chin squid-head sons of bitches that they could not have picked a worse enemy than the human race. We are going to blow the hell out of those dumb bugs until we don't have anything left to shoot 'em with! And then, we are going to strangle them with their own living guts!" {Turns around} "Am I right, Marines?"
Sergeant Johnson (Legendary): "Men, we led those dumb bugs out to the middle of nowhere to keep 'em from gettin' their filthy claws on Earth. But, we stumbled onto somethin' they're so hot for, that they're scramblin' over each other to get it. Well, I don't care if it's God's own anti-son-of-a-bitch machine, or a giant hula hoop, we're not gonna let 'em have it! What we will let 'em have is a belly full of lead, and a pool of their own blood to drown in!" {Turns around} "Am I right, Marines?"
Marines: "Sir, yes sir!"
Sergeant Johnson: "Mmm-hmm. Damn right I am. Now move it out! Double time!"
The view angle changes to outside of where they were. Marines running, the Sergeant meanwhile walks slowly.
Cortana: (O.S.) "Attention all personnel: We are reengaging the enemy. Internal and external contact imminent."
Sergeant Johnson: "All you greenhorns who wanted to see Covenant up close...this is gonna be your lucky day."
{Cut to a computer screen.}
>X - CORTANA 1 0 CRYOSTOR. 23.4.7
>(PRIORITY ALPHA)
>UNSEAL THE HUSHED CASKET
Tech Officer Sam Marcus: "Whoa! Sir?"
Tech Chief Thom Shephard: "Right. Let's thaw him out."
The Crewmen begins pressing buttons
Tech Officer Sam Marcus: "Okay. Bringing low-level systems online. Cracking the case in thirty seconds." {Pause, as they show Master Chief's cryo tube} "He's hot! Blowing the pins in five."
Part 02: Reveille
Testing only happens in Easy & Normal difficulties
{Gameplay}
Tech Officer Sam Marcus: "His suit shows green. Cycle complete."
{Tube cover lifts itself}
Tech Chief Thom Shephard: (salutes) "Sorry for the quick thaw, Master Chief. Things are a little hectic right now. The disorientation should pass quickly."
Tech Officer Sam Marcus: (O.S.) "Welcome back, sir! We'll have you battle ready stat."
Tech Chief Thom Shephard: "Chief, please look around the room. I need to get a calibration reading for your battle suit's diagnostics."
The Chief begins looking around.
Tech Chief Thom Shephard: "Good. Thank you sir."
Tech Officer Sam Marcus: (O.S.) "I'm bringing your health monitors online, sir."
{The Chief's health bars appears}
Tech Chief Thom Shephard: (examines panel) "Vital signs look normal. No freezer burn. Okay sir, go ahead and climb out of the cryo tube."
{Master Chief gets out of the cryotube}
Tech Chief Thom Shephard: "I gave you a double dose of the wake-up stim. Take a quick walk around the cryo bay and join me at the optical diagnostics station when you're ready."
{Thom walks over, soon Master Chief follows him and stands on red square}
{If the Chief does not face Thom or begins to wander}
Tech Chief Thom Shephard: " Sir, I need you to look at me so we can begin."
{When the Chief faces Thom and stands on the square)
Tech Chief Thom Shephard: "I know the ordinance techs usually take care of your targeting sensors, but we're short of time, Chief. Just look at each of the flashing panels to target them. When you lock on, it'll change color."
{Chief looks at the flashing lights}
Tech Chief Thom Shephard: "Okay, that looks good..."
Tech Officer Sam Marcus: "Sir, I'm getting some calibration errors. I'm going to invert your looking pitch, so you can see if you like it better that way." {pitch is inverted} "Try targeting the flashing lights again. Is that better or should I switch it back?"
{The Chief decides the way he wants}
Tech Officer Sam Marcus: (O.S.) "OK, I'll leave the pitch normal/inverted. But if you want, you can change it yourself later. (pause) I'm ready for the energy shield test now."
Tech Chief Thom Shephard: "Please follow me to the energy shield test station."
Cortana (COM): (O.S.) "Fire teams, report to defensive positions Alpha through Sierra: Sensors show inbound Covenant boarding craft. Stand by to repel boarders."
{The Chief steps into the square}
Tech Chief Thom Shephard: "Okay, bring his energy shields online please."
{The Chief's shield meter appears}
Tech Officer Sam Marcus: (O.S.) "Alright. Shields read as fully charged."
Tech Chief Thom Shephard: "Okay Sir. Bring them down to test the automatic recharge."
{Chief's shields get zapped away, and soon starts to recharge}
Tech Officer Sam Marcus: (O.S.) "Recharging normal. Showing green across the board."
Captain Keyes (O.S.): "Bridge to Cryo 2, this is Captain Keyes. Send the Master Chief to the bridge immediately."
Tech Chief Thom Shephard: "Captain, we'll have to skip the weapons diagnostics and I-"
Captain Keyes (O.S.): "On the double, crewman."
Tech Chief Thom: "Aye aye sir. {Pause} The skipper seems jumpy, we'd better get moving. We'll find your weapons later."
Tech Officer Sam Marcus (O.S.): "Okay. I'll leave the self-diagnostics running, at least."
Tech Chief Thom Shephard: "Good idea. You'd better get to your evac group, Sam!"
Tech Officer Sam (O.S.): "Affirmative. just have to reset the computer and I'm outta here!" {loud explosion on the door} "Oh God! They're trying to get through the door! {door breaks open, an Elite Major fires on Sam} Security! Intruders in Cryo 2! No, please don't- {An energy bolt hits Sam, he falls} AHHHH!!!"
Tech Chief Thom: "Sam! Sam! C'mon, we've got to get the hell out of here. This way!"
{Thom leads Master Chief out and down a corridor, and a door explodes, killing the crewman. The Master Chief finds crewman battling the Covenant while another crewman is killed by an explosion.}
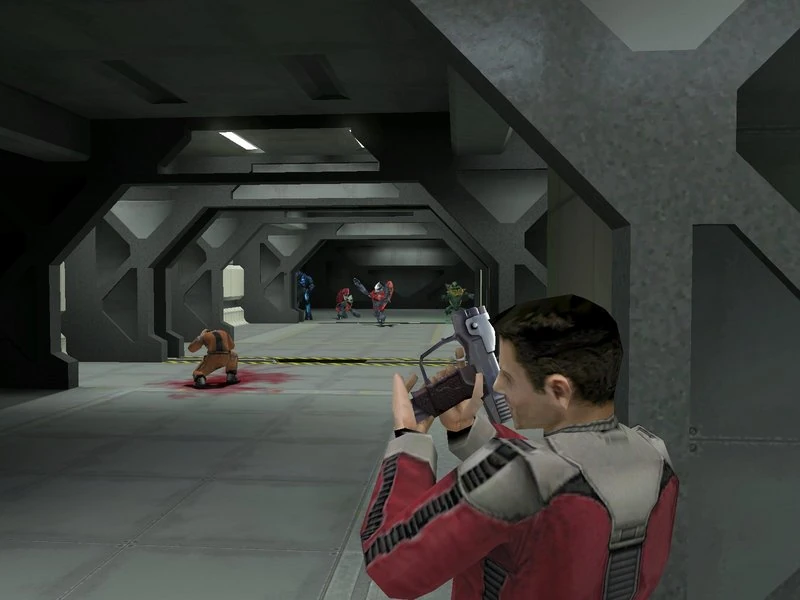
Crewmen attempt to fight off alien boarders.
Crewman 2: Secure those blast doors! Move! MOVE!
A few crewmen run into the room while the doors are closing
Crewman 1: They're right behind us!
{He is hit by a plasma bolt while his comrades continue through. One makes it through quickly, the other is slower.}
Crewman 3: Wait for me!
{The crewman which was slower is soon killed by an explosion, and the doors shut.}
Crewman: {If you stay in the room} Master Chief, the situation's secure here. You're probably needed somewhere else!
Random Crewman: Help me, help you!
Chief finds his way to another room with an Elite. It growls but then Marines fire at it, and the Elite flees. (This only happens at Easy and Normal)
Marine 1: "Chief, Cortana says, get to the bridge, double quick!"
{The Chief makes his way to a room where a Marine is helping some crewmen battle the Covenant boarders.}
PFC Chips Dubbo: "Sir! The Captain needs you on the bridge, ASAP! You better follow me." {As they come upon more Covenant} "Get clear, Chief!" {As they get to the bridge} "Captain Keyes is waiting for us, Sir!"
Master Chief approaches The Captain.
Master Chief: "Captain Keyes."
Captain Keyes: "Good to see you, Master Chief. Things aren't going well. Cortana did her best, but we never really had a chance."
Cortana: "A dozen Covenant superior battleships against a single Halcyon-class Cruiser. Given those odds I'm content with three {Pause}... make that four kills." {To Master Chief} "Sleep well?"
Master Chief: "No thanks to your driving, yes."
Cortana: "So, you did miss me."
{A loud explosion occurs}
Captain Keyes: "Report!"
Cortana: "It must have been one of their boarding parties! I'd guess an Anti-Matter Charge!"
Fire Control Officer: "Ma'am! Control for the main cannon is offline!"
Cortana: "Captain, the cannon was my last offensive option!"
Captain Keyes: "Alright then. I'm initiating Cole Protocol Article 2. We're abandoning the Autumn. That means you too, Cortana."
Cortana: "While you do what, go down with the ship?"
Captain Keyes: "In a manner of speaking. The object we found, I'm going to try and land the Autumn on it."
Cortana: "With all due respect, Sir, this war has enough dead heroes."
Captain Keyes: "I appreciate your concern, Cortana, but it's not up to me. Protocol is clear. Destruction or capture of a shipboard AI is absolutely unacceptable, that's means you're leaving the ship. Lock in a selection of emergency landing zones, upload them to my neural lace, and then sort yourself for a hard transfer."
Cortana: "Aye aye, Sir."
{Cortana's avatar disappears.}
Captain Keyes: "Which is where you come in, Chief. Get Cortana off this ship. Keep her safe from the enemy. If they capture her, they'll learn everything. Force deployment, weapons research... Earth."
Master Chief: "I understand."
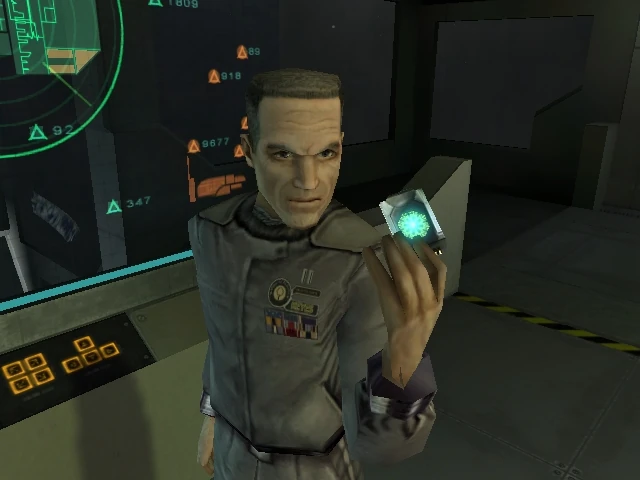
Captain Keyes holding Cortana's data chip.
{Cortana's avatar reappears}.
Cortana: "The Autumn will continue evasive maneuvers until you initiate a landing sequence. Not that you'll listen, but I'd suggest letting my subroutines handle the final approach."
Captain Keyes: "Excellent work, Cortana. Thank you. Are you ready?"
{Cortana looks about the bridge for a moment.}
Cortana: "{Sigh}...Yank me."
{Captain Keyes pulls a data chip out of the holotank and gives to the Master Chief}. Captain Keyes: "Good luck, Master Chief."
{The Chief slides the chip in his helmet.}
Cortana: "Hmm... Your architecture isn't much different from the Autumn's..."
Master Chief: "Don't get any funny ideas."
Part 03: AI Constructs and Cyborgs First!
{Gameplay}
Captain Keyes: Handing the Chief his pistol. "I don't keep it loaded, so you'll have to find ammo as you go."
If you linger next to Captain Keyes...
Captain Keyes: "Get moving, Master Chief. There's nothing you can do here."
If you stand idle for even longer...
Captain Keyes: (Infuriated) "I gave you an order, soldier. Get off this ship!"
If you kill Captain Keyes or any crewmen...
Cortana: (Shocked and Infuriated) What the hell are you doing?
Cortana radios in Marines to kill the rampant Chief
Cortana: Security to the bridge, the Master chief has gone rampant! Take 'em down boys...
Marines come in and quickly kill Master Chief, taunting him afterward.
Continuing, without killing anyone in the bridge, Cortana and master chief see groups of Marines engaging the Covenant in the mess hall.
Cortana: "Those Marines could use some help, Chief! Do what you do best!"
The Chief steps over a body of a dead marine and picks up his assault rifle.
If you lose a health bar
Cortana: "Keep your head down, there's two of us in here now, remember?!"
Upon coming across a group of three marines, and hearing a large explosion
Marine 4: "What the hell? Did something just hit us?"
Marine 5: "Move in! Back to the airlock!"
{Explosion comes from the airlock, caused by a covenant-boarding vessel crashing into the Pillar of Autumn, both marines are killed.}
Upon seeing a Covenant boarding vessel
Captain Keyes (O.S.): "Combat teams on decks five through nine, fall back to secondary defensive positions."
Cortana: "They're using our lifeboat airlocks to attach their boarding craft...we go out and they come in. Clever bastards..."
Captain Keyes (O.S.): "Ops personnel on decks nine through twelve, report to evac stations now."
As the Chief comes into a room where the Covenant are on a ledge above him.
Cortana: "Covenant! On the landing above us!"
After the battle on the ledges
Captain Keyes (O.S.): "All hands. This is the Captain. Prepare to abandon ship. Combat teams; repel boarders until Ops personnel are away. Good luck. Keyes out."
As the Chief see a lifepod launching with lasers bursting all around it
Cortana: "The lifepods are launching. We should hurry."
Pause, while lots of explosions occur. You look through a window and see three lifepods launching. One of them is hit by enemy fire and explodes.
Cortana: "The Covenant are destroying the lifepods...they really don't want us on that ring. (Pause) Warning... blast doors closing! We have to use the ship's maintenance access ways. Follow the NAV point, it will lead you to an opening."
Captain Keyes (O.S.): "Combat teams Alpha through November, pull out to nearest evac station."
As the Chief move around in the tunnels...
Cortana: "I'm detecting Covenant movement outside the access ways. Activating motion tracker. Let's find a safe exit."
Cortana: "We're too close. We need to find another route. Motion tracker shows all clear."
The Chief encounters a broken door, Easy and Normal difficulties only.
Cortana: "Wait... we need to get through that door, but it's been damaged by an explosion. Analysing... The door's control mechanism is offline, but it's taken a lot of damage. You should be able to bash it open with the butt of your weapon."
A while later, during another fight.
Captain Keyes (O.S.): "Combat teams Sierra through Victor, prepare for evac."
As the Chief crosses through the control room for his cryotube bay and see Elites looking around in the bay..
Cortana: "It looks like the Covenant wanted to catch you napping."
The Elite intruders spot Master Chief and open fire on him with no effect due to the glass protection, and soon leave the cryotube.
A while later, during another fight.
Captain Keyes (O.S.): "All combat personnel, fall back to tertiary defensive positions."
Later, while the Chief passes through a damaged part of the ship
Cortana: "The damage to the superstructure is extensive...I don't know how much more abuse the Autumn can take!"
Captain Keyes (O.S.): "Combat teams, fall back to secondary defensive positions."
As the Chief encounters a squad of Covenant near a lifeboat...
Cortana: "There's one last lifeboat! Quickly, get aboard before it launches!"
Part 04: Escape
Frightened Marine: {trips and falls} "Oh no...oh no!" (Picked up by the Chief and thrown into lifepod) "Ahhh!"
Cortana: "Now would be a very good time to leave!"
Master Chief: {Stepping into the lifepod} "Punch it."
Pilot: "Aye aye, Sir."
{Lifepod launches}
Pilot: "We're disengaged. Goin' for minimum safe distance."
Panicking Marine: "We're gonna make it, aren't we, Sir? I don't wanna die out here!"
{The Chief pats him on the shoulder}
Cortana: "Look!"

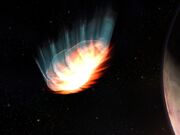
The Bumblebee lifeboat hits Halo's atmosphere.
{As Halo swings into view and the Bumblebee drops towards it}
Strapped-in Marine: "What is that thing, Lieutenant?"
Pilot: "Hell if I know. But we're landin' on it."
Panicking Marine: "The Autumn! She's been hit!"
Cortana: "I knew it! The Autumn 's accelerating, Keyes is going in manually!"
Pilot: "Heads-up everyone, this is it. We're entering the ring's atmosphere in five..."
Cortana: "Sure you wouldn't rather take a seat?"
Master Chief: "We'll be fine."
Cortana: "If I still had fingers, they'd be crossed."
{The Bumblebee heads into Halo's atmosphere}
Walkthroughs
Easy Walkthrough
Part 01: Reveille
Welcome to the world of Halo! First thing's first. Climb out of the Cryo tube. Do your Aiming Diagnostics Test, then your Shielding Diagnostics Test. Then, exit the room with the technician. The man will run towards a door, he will die. Don't bother following him, it's a waste of time, find your own way through the pipes by jumping over them, and you will see another corridor leading to your objective. It's simple and straightforward.
Now, follow the Marine who will lead you to the bridge. He will stop to kill some covenant but you just follow the corridor to get to Captain Keyes.
Part 02: AI Constructs and Cyborgs First!
As you leave the Bridge, your Pistol will appear. Your first three enemies in the game are two Minor Grunts and one Major Grunt. Take them down with your pistol (try practicing some headshots); it shouldn't be that hard, even for a beginner. Reload your pistol and walk into the cafeteria, and you will automatically pick up an Assault Rifle. Take down all the enemies in the room, you can also duck behind some steel barriers and let the incoming Marines (accompanied by Johnson) take down the Elites. You can also hide behind the steel barrier to snipe down Grunts and Minor Elites with your pistol's scope. Head-shots are practically useless against Elites unless their shield is down.
Once the room is clear, swap your Assault Rifle for the Plasma Pistol. Now, exit the cafeteria. By now, your weapons should be the Plasma Pistol and a Pistol. The advantage of the Plasma Pistol is that it does not need to reload, and can take down Elite's shield with one charge bolt, but the disadvantage is that it can overheat and run out of ammo quickly.
After preparing weapons and all, follow the hall until you come to an Elite who foolishly has its back turned to you. Melee to kill him instantly and proceed. Continue onwards, and you will reach two Marines about to be killed by a Covenant boarding party. Don't go near the Marines unless you want to either die or lose most of your health. Anyway, when they come out, charge your Plasma Pistol at the Elite(s) (the number of Elites depend on chance) and take care of the rest with your Pistol. Go inside the Covenant Boarding Ship and pick up the Over-shield. You might need it. An Overshield will project itself over your shield and triple its effectiveness.
Then proceed into the dark hallway. Some survivors of the last skirmish might still be here, so beware. Use your flashlight when necessary. In the next hallway, you'll see some Marines firing. Instead of joining them, turn right. A panicked Grunt will come running towards you. Kill him. You'll find yourself in an ideal flanking position. Use your Pistol to take them down, and use your Plasma Pistol to take care of the rest.
Swap your Plasma Pistol for the dead Elites Plasma Rifle. After the battle, continue through. A Plasma Grenade will kill your Marines, so don't go near them... yet. Now, proceed through and use your Plasma Rifle to take down the enemies which consist of a Minor Elite and several Grunts. Swap your Plasma Rifle for the Plasma Rifle that used to belong to the now-dead Elite.
Go into the next hallway, which will be infested with Covenant. Use a mixture of Plasma Rifle bursts and Pistol rounds to take them down.
The next area will have some allies fleeing from a group of Covenant. Kill the Elite first, as he poses more of a threat towards you and your allies. Then, melee the Grunts to death, it's a waste of ammo trying to shoot them down here.
Continue through the hallway. It'll lead you to some stairs with enemies scattered everywhere. Doesn't matter; take them out with your Pistol scope and your Plasma Rifle when they get close. Bear in mind that you must always swap Plasma weapons frequently. Swap your Plasma Rifle for another Plasma Rifle with more battery. After you have finished the enemies on the top level off, there would have been another Minor Elite and more Grunts on the bottom level, however, they are no matter. Take them down with your Plasma Rifle. Go back up the steps and continue on through the doors. There should be a heap of enemies here. No matter, you have your Marines to help you, if you haven't killed them yet. Take the Health Pack if necessary. Retreat when your shields are down.
In the next hall, there will be about seven Grunts and an Elite behind a Covenant Shield. Take the Grunts down; the Elite will ignore you unless you come up close to him. Take the Grunts out with your Pistol and take down the Elite with your Plasma Rifle.
Keep on proceeding, eventually you'll meet Grunts a fair distance opposite from you. Scope in and put the Grunts into a permanent trip to sleep with your Pistol. Then, proceed. Cortana will tell you to follow the NavPoint into the airlock.
Use your flashlight to find your way through(or if you're daring, you can pop in and out to take pot shots at the enemies). After you have found your way through, melee the door, walk forward; turn left and melee the Grunt with your weapon. He will die instantly.
Next, there will be a bunch of Covenant. Kill them with any method you please. Replenish your Plasma Rifle.
Continue down the right way and you'll reach the blackened and charred hallways of the ship. The lone Major Elite at the end of the hall shouldn’t have spotted you yet. Keep your distance and scope him with your Pistol. If the Pistol won't kill him, then the explosion will. Go into the charred parts of the room. Another explosion will occur, killing all but maybe a few Grunts, don't pay any attention to them, and go into the airlock.
There will be two Grunts, melee them. Then, use your flashlight to aid your way through.
Eventually, you'll reach a place full of Marines fighting Elites and Grunts. Take them all down.
Continue through. You'll be opposite some barricades, and some Frag Grenades. Pick them up, and throw them onto the other side, which will be full of Grunts and one Major Elite. Once they are all dead, jump over the barricades, and go into the lifeboat.
Congratulations! You have finished the first level of Halo!
Normal Walkthrough
Part 01: The Pillar of Autumn
{Cinematic}
Part 02: Reveille
Welcome to the world of Halo! This first part is easy, but don't let that give you a bad impression of the game. For now, just follow the Marine's instructions carefully. Aim at the flashing panels and charge your energy shield. After that, Captain Keyes will order Master Chief to the bridge, skipping your weapons training. Too bad. Sam the wonderful technician, he'll get killed when an Elite manages to blow through the door. His friend will run out of the cryo bay, asking you to follow him.
Ok, so he didn't make it either. Instead, jump over the pipe, turn right and go down the hall. There will be another dead technician in front of the door. Go forward, and you will trigger an explosion from a couple of burning pipes. It won't drain your shields though. Go through the door and crouch below a half opened blast door. The scene behind is utter chaos. Two Elites are firing at a group of innocent technicians, but the blast doors will eventually close and trap the Covenant inside the other room. Go through the only door in the place, and enter the dark hallway. You might want to activate your flashlight by pressing the white button (or by pressing Q if you're playing on a PC). After the door opens, a Minor Elite will roar at you, but he'll retreat when shot by two Marines. Proceed onwards. Then you will meet a Marine that will lead you the rest of the way to the bridge. Walk towards Captain Keyes and trigger the cinematic.
Part 03: AI Constructs and Cyborgs First!
All right, Keyes has given you the Pistol and I know you're aching to shoot something with it, but you can't use it just yet. Get out of the bridge to the hallway you came from. Your Pistol should activate, and some Grunts will appear in the hallway, panicking when they see you. Melee them to conserve ammo. Congratulations, you’ve killed your first Covenant! But don't spend too much time celebrating. This is just a small victory.
A door will open, and you'll see several Marines fighting a group of Grunts and an Elite may vary depending on the difficulty. Pick up the Assault Rifle, reload and start firing at the Elite, spraying and bashing until he goes down. Mop up the rest of the Grunts as well.
Additional groups of Covenant will pour in from an open door on the other end of the hall. Two Elites and lots of Grunts will be there. Zoom in with the Pistol and take out the Grunts with headshots and rapidly advance on the attacking aliens. Spray the Elites with Assault rifle fire and melees until they are down. Beware however, as these guys are very strong and can whack you to death. Proceed to the next room, paste the walls with Grunts and carry on. You might want to try out one of the Covenant plasma weapons. Try them out and see if you like them. You can't reload them but they're a lot of fun and are powerful indeed. After preparing weapons and all, follow the hall until you come to an Elite who foolishly has its back turned to you. Melee and proceed. Continue onwards, and you will reach two Marines about to be killed by a Covenant boarding party. Charge in, whacking, shooting and decimating anything that moves. It might be intimidating if it's your first try but it's a lot of fun. Remember you do have Marine back up. After the fight, pick up one of the Overshields at the end of the craft. Then proceed into the dark hallway. Some survivors of the last skirmish might still be here, so beware. Use your flashlight when necessary. In the next hallway, you'll see some Marines firing. Instead of joining them, turn right. A panicked Grunt will come running towards you. Kill him. You'll find yourself in an ideal flanking position. Spray them with bullets and retreat when you need to reload. The aliens, not able to withstand the crossfire, will soon fall back. Engage and annihilate as they do.
After the battle, replenish your ammo and supplies, and continue on. A Plasma Grenade detonation will kill a Marine in the passageway in front of you. Turn right and aid the Marines in killing the Covenant. The next hallway will be infested with a healthy population of enemies. Deal with them any way you see fit, taking cover when your shields are down. Remember that Overshield? If you still have some left, try and get rid of it in this fight. After you've killed the entire Covenant in the vicinity, go inside the Boarding craft and retrieve another one of them. The next area has two desperate unarmed technicians fleeing from a menacing group of nasty aliens. First, deal with the covenant on the right, taking down the Elite's shield and bashing him to death. Or for a change, use the deadly pistol combo. Melee the Grunts as well. Then focus on the Grunts and the Elite on the left. Then go back left, and get one of those Health Packs if needed. Continue.
Next part: The stairs. This might seem intimidating but it's not. At least not on Normal, on Legendary this part is a pain in the ass. Put your pistol to good use on the Grunts while climbing the stairs. Once on top, proceed to spray the Elites with gunfire as well as the Grunts and Elites that appear. After you've finished those off, kill the remaining Grunts downstairs. You'll immediately notice the many dead bodies of Marines lying here. Further down the hallway; the perpetrators. Avenge their deaths mercilessly. In the next hall, there'll be about seven Grunts and an Elite behind an Energy shied. Kill him with the deadly Pistol combo. When proceeding you'll notice a life pod being destroyed when you look out the window. Kill the Grunts guarding the airlocks and proceed to the NavPoint Cortana gives you. Use your flashlight to find your way in these cramped technician's hallways. When you emerge, knock down the door and walk forward, melee the Grunt while you're at it. You can choose to pick them off here one by one, or instead charge in and blast them. Or yet again shoot one and see what happens. Take them out any way your heart desires. Continue down the right way and you'll reach the blackened and charred hallways of the ship. The lone Elite at the end of the hall shouldn’t have spotted you yet. An explosion should be triggered, half draining the Elite's shield and making him easier to kill. The ensuing explosions will kill the Grunts nearby. Killed by their own fleet's doing. Go into the tunnel, turn right, and kill both Grunts lurking there.
Emerging from the tunnels, you reach a place where an Elite and lots of Grunts are combating Marines. Like most fights on this level, there is no real strategy. Surprise your fellow creature/alien/animal and whack him in the side. Finish off the Grunts while they run for cover and continue on ahead. After a lot of Grunts you'll reach a barricade chock-full of Covenant bad guys. You can flank them by going into the hallway on your right or just shoot them from where you stand. When confronted with large groups of enemies, your first priority should always be to reduce the incoming fire as much and as fast as possible. That being said, aim for the Grunts and take them down. The less guns shooting at you, the less distraction when dealing with the Elites. After mopping them up, you'll reach yet another barricade. The final one. This part is pretty fun. Pick up the fragmentation grenades. There's a group of Grunts and a Major Elite on the other side. Greet them appropriately, using your newfound toys. After you're done, walk to the lifeboat and enjoy the cinematic.
See a walk-through of the level. It is divided into two parts: [1] and [2].
Trivia
Glitches
- If you play the level on Easy or Normal, you have the option to look around from inside the Cryo-tube before stepping out and can even see your characters' lower body, in some ways making it the first time that the player could see their feet in 1st person other than in the future Halo games.
- If you play the level on Heroic or Legendary, some of the cinematics in the level won't occur such as when the Marines fend off the Elite Minor in the darkened hallway. This could be caused by a glitch.
- There is a glitch which allows the player to get back into the cryotube. The player must jump inside the tube and crouch before the cover closes. Once inside, you will be able to see the MJOLNIR armor without a head. Also if you do it quick enough you will be able to see the opening cutscene again.
- It's possible to stand outside of the energy shield test station while the test is running. Just move carefully into the square and when it starts, the machine will push you out, freezing you in place until the process is done.
- If you kill Captain Keyes in the control bridge, Cortana will say that Master Chief has gone rampant and invincible marines will storm into the room and try to take you down. Alternatively, if you kill the crewmen next to him, but not Captain Keyes, Cortana will still sound the alarm of your rampancy. The bridge's exit doors will be locked down preventing you from escaping. You can also kill a crewman, then shoot at a man in a chair. If you shoot them in the head they will not die but the reticule will change from blue to red when you target them.
- There was an early bug in the making of the game in which Cortana was transparent and the screen display in the bridge of the Pillar of Autumn was transparent.
- There is a glitch in the level that allows you to carry three weapons instead of only two.
- There is a driverless Warthog at the beginning of the cutscene.
Mistakes
- Sam and Thom are wearing orange fatigues in the beginning cut scene, but during the diagnostic, they are wearing yellow fatigues.
- The pilot that shouts to Cortana "Ma'am! Control for the main cannon is offline!" wears blue in the cut scene, however, when you walk up to him, he wears yellow.
- The pilot in the escape pod also calls the Master Chief "sir" although she is a lieutenant. Technically, this makes her Master Chief's superior officer, however many other higher ranked Marines also do the same as, more than likely, the current situation where the Master Chief's involvement required him to be in command. Meaning he was temporarily in command of them until told otherwise.
- If you look closely, you can see that when the Master Chief's escape pod launches, it still has its rear hatch open.
- Captain Keyes tells the combat forces to pull back to their tertiary (3rd) positions before he tells them to pull back to their secondary (2nd) positions.
Easter Eggs
- If you look at the main view screen in the bridge, you can see an image of Halo on the screen and next to it is the word "Halo". This is odd because until the level Truth and Reconciliation, they don't know what it's called, though the computer may be stating what the construct's shape is.
- The bulletin board located near the entrance to the bridge has many fliers that can be read, including the flyer for the missing cat, Jonesy.
- In the Mess Hall, there are two vending machines, FOOD and DRINKS. The FOOD includes Turkey Dinner, Hamburger Dinner, Cheeseburger Dinner, Hotdog Dinner, Meatloaf Dinner, and Chef's Special. The DRINKS include Lemon/Lime, Root Beer, Orange, Water, Lemonade, Coffee, Hot Tea, Chef's Special and 3-4 others that are unreadable.
- There is also "The Megg" which looks like an M made from blood and bullets.
- In the cryo chamber, you can walk up next to each cryo tube and see a set of MJOLNIR armor in the tube. All sets of armor in the cryo chamber are white except for the armor in the tube you stepped out of, which is the normal iridescent green.
References
- Johnson has different dialogue in the first cutscene if you play the level on different difficulties just as he does now in the beginning of Halo 3 and in Halo 2 on the levels Outskirts and Metropolis.
- 'Reveille' is French for 'waking up', referring to the Chief's cryogenic sleep. It is also the name of the bugle call commonly heard in the U.S. military that is played at sunrise each day.
- If you listen to the Naval personnel fighting at the beginning of the level, they will say, "I'm a cowardly fool!" and "Help me! Help you!". In the level The Storm in Halo 3, the construction workers can be heard saying the same lines.
- The phrase "Unseal the Hushed Casket" is a reference to the last line of John Keat's sonnet 'To Sleep'.
- The way that the Covenant boards the Pillar of Autumn is similar to the way that the Empire invades the Rebel ship Tantive IV in Star Wars: Episode IV: A New Hope.
- Also an possible Star Wars reference the way you escape from the Autumn in an lifeboat towards the Halo is similar to how C-3PO and R2-D2 escape from the Tantive IV towards the planet Tatooine.
- The Naval personnel uniforms look vary similar to the uniforms seen in the Star Trek franchise.
Miscellaneous
- Halo: The Flood states that Jackals were also encountered in the fight for the Pillar of Autumn. However, Jackals were not encountered and seen fighting. This may be because the Jackals were fighting in places you were not, possibly due to the Jackal's pirating nature.
- Sergeant Johnson appears a few times in this level. Firstly, when he is giving his speech to the line of Marines and also appears as the driver of the Warthog in the background at times. He is in the mess hall fighting Covenant. He then sometimes appears guarding a lifeboat airlock, and then is killed in an explosion, and finally appears in the battle with the Covenant on the landing. He also appears sometimes to kill you if you kill Keyes.
- During the energy shield test, the sound of the machine activating is the same as the plasma pistol firing a charged shot. This could be because Bungie actually used a plasma pistol to take out your shields.
- The number of the lifepod you escape in is 61. 6+1=7. This could possibly be another seven reference.
- "Keyes," on Jacob Keyes' uniform says "Hello my name" above it.
- You can get to space by glitching in the first lifepod area