mNo edit summary |
m (→Sources: update ref tags, replaced: {{Reflist}} → {{Ref/SourceList}}) |
||
| (18 intermediate revisions by 12 users not shown) | |||
| Line 1: | Line 1: | ||
| + | {{DISPLAYTITLE:Terminal}} |
||
{{Era|H2}} |
{{Era|H2}} |
||
{{Multiplayer Map Infobox |
{{Multiplayer Map Infobox |
||
| Line 6: | Line 7: | ||
|location=[[New Mombasa]], [[Earth]] |
|location=[[New Mombasa]], [[Earth]] |
||
|terrain=Train Station |
|terrain=Train Station |
||
| − | |weapons=*[[BR55 |
+ | |weapons=*[[BR55 Service Rifle|Battle Rifle]] |
| − | *[[Carbine]] |
+ | *[[Type-51 Carbine|Carbine]] |
*[[Type-1 Energy Weapon/Sword|Energy Sword]] |
*[[Type-1 Energy Weapon/Sword|Energy Sword]] |
||
*[[M6C Personal Defense Weapon System|Magnum]] |
*[[M6C Personal Defense Weapon System|Magnum]] |
||
| Line 13: | Line 14: | ||
*[[Type-25 Directed Energy Rifle|Plasma Rifle]] |
*[[Type-25 Directed Energy Rifle|Plasma Rifle]] |
||
*[[M19 SSM Rocket Launcher|Rocket Launcher]] |
*[[M19 SSM Rocket Launcher|Rocket Launcher]] |
||
| − | *[[Shotgun]] |
+ | *[[M90 Close Assault Weapon System|Shotgun]] |
*[[M7/Caseless Submachine Gun|SMG]] |
*[[M7/Caseless Submachine Gun|SMG]] |
||
| − | *[[Sniper Rifle System 99C- |
+ | *[[Sniper Rifle System 99C-Series 2 Anti-Matériel B|Sniper Rifle]] |
*[[M9 High-Explosive Dual-Purpose Grenade|Fragmentation Grenades]] |
*[[M9 High-Explosive Dual-Purpose Grenade|Fragmentation Grenades]] |
||
*[[Type-1 Antipersonnel grenade|Plasma Grenades]] |
*[[Type-1 Antipersonnel grenade|Plasma Grenades]] |
||
| Line 25: | Line 26: | ||
*[[Capture the Flag|CTF]] |
*[[Capture the Flag|CTF]] |
||
*[[Assault]] |
*[[Assault]] |
||
| + | *[[Oddball]] |
||
| + | *[[Territories]] |
||
| + | *[[King of the Hill]] |
||
| + | *[[Juggernaut]] |
||
|playernumber= |
|playernumber= |
||
*6-16 |
*6-16 |
||
}} |
}} |
||
| − | + | {{align|center|''Were you looking for the series of [[List of seven references in Halo|seven]] easter eggs in [[Halo 3]], the [[Terminal]]s?''}} |
|
| − | + | {{align|center|{{Article Quote|The CTMS made New Mombasa's rail system one of the safest on Earth; unfortunately it was one of the Covenant's first targets.}}}} |
|
| − | '''Terminal''' is a fairly large asymmetrical multiplayer map in ''[[Halo 2]]''. |
+ | '''Terminal''' is a fairly large asymmetrical multiplayer map in ''[[Halo 2]]''. Terminal was added to ''[[Halo 2]]'' in the [[Maptacular Pack]]. |
| − | == |
+ | ==Description== |
It is set on [[Earth]], in the city of [[New Mombasa]], in a huge train station called [[Liwitoni Station]]. MagLev trains speed through the level at regular intervals. This map includes the [[Type-26 Assault Gun Carriage|Wraith]] as the default heavy for [[multiplayer]]. |
It is set on [[Earth]], in the city of [[New Mombasa]], in a huge train station called [[Liwitoni Station]]. MagLev trains speed through the level at regular intervals. This map includes the [[Type-26 Assault Gun Carriage|Wraith]] as the default heavy for [[multiplayer]]. |
||
| − | There is a thunderstorm either to the north or to the south of the station, although the skyscrapers mostly hide it. |
+ | There is a thunderstorm either to the north or to the south of the station, although the skyscrapers mostly hide it. |
| + | |||
| + | == Gameplay == |
||
=== Territories === |
=== Territories === |
||
| Line 124: | Line 131: | ||
"Safety is everyone’s responsibility." |
"Safety is everyone’s responsibility." |
||
| − | :A |
+ | :A joke directed towards the constant fighting throughout the terminal. |
"Attention: inbound train." |
"Attention: inbound train." |
||
| Line 130: | Line 137: | ||
"Welcome to Station 7: Liwitoni. Please refer to video monitors for current information." |
"Welcome to Station 7: Liwitoni. Please refer to video monitors for current information." |
||
| − | :Another [[ |
+ | :Another [[List of seven references in Halo|7]] reference. Also, all the video monitors are tuned to channel 7. |
"Children must be monitored at all times. Do not leave children unattended in station." |
"Children must be monitored at all times. Do not leave children unattended in station." |
||
| Line 141: | Line 148: | ||
== Strategies == |
== Strategies == |
||
[[File:Terminal map.gif|175px|thumb|right|A map of Terminal.]] |
[[File:Terminal map.gif|175px|thumb|right|A map of Terminal.]] |
||
| − | In [[Capture the Flag|CTF]], |
+ | In [[Capture the Flag|CTF]], it's a good idea to attempt to draw the enemy with the flag onto the tracks so you don't waste your ammo. |
In a capture the flag match, it would be best if you are attacking, to jump into a Warthog (a [[M12G1 Light Anti-Armor Vehicle|Gauss Warthog]]) and get a gunner. Do not wait for other teammates to get in the passenger seat. Instead of going up the ramp, go in between the ramp, and the train wall, and take out the Wraith as quickly as possible. It does not matter if nobody is in it. Just destroy it; this will help your team a lot. |
In a capture the flag match, it would be best if you are attacking, to jump into a Warthog (a [[M12G1 Light Anti-Armor Vehicle|Gauss Warthog]]) and get a gunner. Do not wait for other teammates to get in the passenger seat. Instead of going up the ramp, go in between the ramp, and the train wall, and take out the Wraith as quickly as possible. It does not matter if nobody is in it. Just destroy it; this will help your team a lot. |
||
| Line 147: | Line 154: | ||
*If you are the defending team you have three priorities besides guarding the flag... |
*If you are the defending team you have three priorities besides guarding the flag... |
||
#Get the [[Type-1 Energy Weapon/Sword|Energy Sword]]. Should the offensive team have it, neutralize the wielder as fast as possible and then take it for your own use. One of the reasons to do so is the Wraith. Should someone on your team be manning it, and a sword wielder sword-cancels or just swords the Wraith, the sword will glide safely right up to it and instantly be able to board the vehicle and possibly kill the driver. |
#Get the [[Type-1 Energy Weapon/Sword|Energy Sword]]. Should the offensive team have it, neutralize the wielder as fast as possible and then take it for your own use. One of the reasons to do so is the Wraith. Should someone on your team be manning it, and a sword wielder sword-cancels or just swords the Wraith, the sword will glide safely right up to it and instantly be able to board the vehicle and possibly kill the driver. |
||
| − | #Kill the enemy rocket-man and steal the [[Rocket |
+ | #Kill the enemy rocket-man and steal the [[Rocket launcher]]. Even if the Rocket Launcher has one round left, keep it! Don't let it respawn! If you fire the last one, still hold on to it and prevent it from respawning, as doing this will slow the offense down. Give it to some one who is good with it or drives your team's Wraith. |
#Keep the Wraith Tank in one piece! This is obvious; the Wraith is the ultimate vehicle based weapon platform in the map. Do not lose it! If it is destroyed, defense will be twice as hard since enemy [[Type-32 Rapid Assault Vehicle|Ghosts]] and [[M12 Force Application Vehicle|Warthogs]] can roll right up to your base and give you hell. |
#Keep the Wraith Tank in one piece! This is obvious; the Wraith is the ultimate vehicle based weapon platform in the map. Do not lose it! If it is destroyed, defense will be twice as hard since enemy [[Type-32 Rapid Assault Vehicle|Ghosts]] and [[M12 Force Application Vehicle|Warthogs]] can roll right up to your base and give you hell. |
||
#If you manage to grab the sniper rifle, you can generally stop most of an assault on your own, as you can destroy Ghosts with shots to the fuel tank, kill any driver if you are skilled enough, and kill ground troops before they even see you. |
#If you manage to grab the sniper rifle, you can generally stop most of an assault on your own, as you can destroy Ghosts with shots to the fuel tank, kill any driver if you are skilled enough, and kill ground troops before they even see you. |
||
| Line 163: | Line 170: | ||
An excellent game mode to try is slayer with Brute Shots and Carbines. The map has an excellent variety of open ground and elaborate buildings that are excellent for such a game style. While I do not suggest the Wraith, Ghosts provide an interesting touch. |
An excellent game mode to try is slayer with Brute Shots and Carbines. The map has an excellent variety of open ground and elaborate buildings that are excellent for such a game style. While I do not suggest the Wraith, Ghosts provide an interesting touch. |
||
| − | == |
+ | ==Development== |
| + | Terminal was designed by [[Chris Carney]] (who was inspired by the [[Wikipedia:SkyTrain (Vancouver)|SkyTrain]] in [[Wikipedia:Vancouver]]), and the artist for the map was [[Mike Zak]]. [[Robert McLees]] provided the fictional transit map for this map.<ref name="bungienetterminal">[http://halo.bungie.net/News/content.aspx?cid=5467 '''Bungie.net:''' ''Next Stop: Terminal'']</ref> |
||
| + | |||
| + | [[Jaime Griesemer]] had come up with two ideas that became the central design elements of the map: a vehicle focused, asymmetrical 4v4 map, and a map where the flag return would be contested.<ref name="bungienetterminal" /> |
||
| + | |||
| + | Early on, the [[M41 Surface-to-Surface Rocket Medium Anti-Vehicle/Assault Weapon|Rocket Launcher]] was replaced with a [[Type-26 Ground Support Aircraft|Banshee]] to counter the [[Type-26 Assault Gun Carriage|Wraith]]. However, the Rocket Launcher was eventually brought back.<ref name="bungienetterminal" /> |
||
| + | |||
| ⚫ | In the early design of Terminal, the light rail train was originally going to be engulfed in flames and people screaming could be heard from the inside as it passed by. The flames were later removed, probably because it was assumed to be too harsh, even for a multiplayer map. The screaming of panicked passengers can still sometimes be heard if you are attentive, as well as the conductor sounding the horn of the train, although much easier to hear. It can be heard in the "Passengers connecting to Orbital Shuttle Hub board westbound trains" file from [http://nikon.bungie.org/misc/h2dialogue.html?cat=terminal&date=20060913 here]. |
||
| + | |||
| ⚫ | |||
| + | |||
| + | ==Trivia== |
||
*The storm above the map has a resemblance to [[The Storm]] of ''Halo 3''. |
*The storm above the map has a resemblance to [[The Storm]] of ''Halo 3''. |
||
| ⚫ | |||
*There is a way to glitch yourself out of the map using the energy sword glitch and a Wraith/Warthog, making the skyscrapers and ledges fully accessible. You can also see a hidden area behind one of the stations, although this area is, as of yet unconfirmed, unreachable. |
*There is a way to glitch yourself out of the map using the energy sword glitch and a Wraith/Warthog, making the skyscrapers and ledges fully accessible. You can also see a hidden area behind one of the stations, although this area is, as of yet unconfirmed, unreachable. |
||
*Sometimes if the train smashes a Warthog, the turret will face the other direction. |
*Sometimes if the train smashes a Warthog, the turret will face the other direction. |
||
*There are two [[United Nations Space Command|UNSC]] recruiting posters on this level. |
*There are two [[United Nations Space Command|UNSC]] recruiting posters on this level. |
||
| ⚫ | |||
| − | **There are posters in the level if you play alone. |
||
| ⚫ | |||
*If you get hit by a train, it is an instant death, even when inside a vehicle. |
*If you get hit by a train, it is an instant death, even when inside a vehicle. |
||
| − | **If you do get hit by a train it will say "Killed by the [[Guardians]] |
+ | **If you do get hit by a train it will say "Killed by the [[Guardians]]." |
*Just one of the glass panels can stop a Sniper round, which will normally go through infantry armor without a problem. |
*Just one of the glass panels can stop a Sniper round, which will normally go through infantry armor without a problem. |
||
*A Tri-gate can be found outside the map. |
*A Tri-gate can be found outside the map. |
||
| Line 183: | Line 199: | ||
*There is an ad for the gold-colored [[Civilian Warthog]] in the map, just like on [[Headlong]] and [[Turf]]. |
*There is an ad for the gold-colored [[Civilian Warthog]] in the map, just like on [[Headlong]] and [[Turf]]. |
||
*It is also possible to survive being hit by the train by jumping and grazing its top edge as it passes. This will cause the player to be launched into the air, draining their shields but not killing them. |
*It is also possible to survive being hit by the train by jumping and grazing its top edge as it passes. This will cause the player to be launched into the air, draining their shields but not killing them. |
||
| ⚫ | |||
| ⚫ | |||
| + | *The train is indestructible, nothing can destroy it, not even a Scorpion. |
||
| ⚫ | |||
| − | *The train |
+ | *The train can disappear by lag but will come back when scripted. |
| − | *The train can disappear by Lag but will come back when scripted. |
||
*The dumpster near the [[Type-26 Assault Gun Carriage|Wraith]] will disappear in CTF. |
*The dumpster near the [[Type-26 Assault Gun Carriage|Wraith]] will disappear in CTF. |
||
| + | |||
| + | ==Videos== |
||
| + | <gallery widths="150" spacing="small" captionalign="left"> |
||
| + | Halo Multiplayer Maps - Halo 2 Terminal |
||
| + | </gallery> |
||
| + | |||
| + | ==Gallery== |
||
| + | <gallery widths="150" spacing="small"> |
||
| + | Terminal Action.jpg |
||
| + | </gallery> |
||
==Sources== |
==Sources== |
||
| + | {{Ref/SourceList}} |
||
| − | <references/> |
||
{{Levels}} |
{{Levels}} |
||
[[fr:Terminal (Carte Multijoueur)]] |
[[fr:Terminal (Carte Multijoueur)]] |
||
[[it:Terminal]] |
[[it:Terminal]] |
||
| − | [[Category:Multiplayer |
+ | [[Category:Halo 2 Multiplayer Maps]] |
| − | [[Category:Multiplayer]] |
||
| − | [[Category:Extra Multiplayer Levels]] |
||
| − | [[Category:Halo 2]] |
||
| − | [[Category:Mombasa]] |
||
| − | [[Category:Halo 2 Vista]] |
||
Revision as of 07:30, 8 December 2017
The CTMS made New Mombasa's rail system one of the safest on Earth; unfortunately it was one of the Covenant's first targets.
|
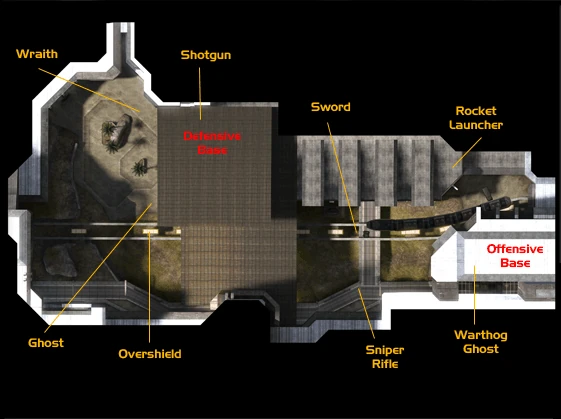
Terminal is a fairly large asymmetrical multiplayer map in Halo 2. Terminal was added to Halo 2 in the Maptacular Pack.
Description
It is set on Earth, in the city of New Mombasa, in a huge train station called Liwitoni Station. MagLev trains speed through the level at regular intervals. This map includes the Wraith as the default heavy for multiplayer.
There is a thunderstorm either to the north or to the south of the station, although the skyscrapers mostly hide it.
Gameplay
Territories
- Train Crossing
- Station Courtyard
- Lower Garage
Terminal PA Announcements
In Terminal Station Level there are PA announcements to add a bit of realism to the map. The announcements, instead of being dry and generic bulletins, are in fact a relatively amusing source of in-jokes, Easter eggs, and Bungie references.
To hear the announcements clearly enough you can stand on the ramp that goes from the raised area inside the terminal up to the station platform. Look at the column with the scrolling "*STATION CLOSED FOR MAINTENANCE*" sign. Just above that sign is an inclined setback. Jump from the ramp to the part of the setback just to the right of the megaphone (you may have to crouch jump to make it). It'll take a few tries, but once you land there without slipping off, you stay there. Now the announcements are loud and clear. The best sound quality can be had by looking towards the map of New Mombasa near the floor.
Or you can listen to the announcements themselves at the HBO Halo 2 Dialog database.
Male Announcer
"A child’s My Pet Blind Wolf stuffed toy has been found. Will the owner please claim it at the lost and found."
"The station cafeteria is now open. Today’s specials feature Bentllama Burgers, Phlegm Brulee, and Scooter Pie."
"Attention passengers: the Old Mombasa 4:18 is running several minutes ahead of schedule." "Will the owner of the brown Über chassis, license code P0-WND, please return to your vehicle."
"Security warning: track section 27 to 45. Please dispatch security detail."
"Janitorial please report to parking level 2 with a mop and bucket. Janitorial to parking level 2."
"Mr. Jones to the white phone, please. Mr. Jones to the white phone."
|
Female Announcer
"Smoking is prohibited at all transit facilities."
"The New Mombasa Transit Authority asks all customers to be aware of their surroundings. If you see any suspicious activity, or unattended packages, please call the New Mombasa transit security hotline"
"Please note: online fare increases will be in effect April 19th."
"Mind the gap."
"Warning: for safety and comfort, passengers should be in good health, and free from heart, back, or neck problems, motion sickness, or other conditions that could be aggravated by high-speed rail travel."
"All passengers are advised to wait in designated areas only."
"Always use overhead walkway when crossing tracks."
"Thank you for riding with New Mombasa Transit. For any questions or concerns, please contact the transit hotline."
"Due to security restrictions, the following stations will not be in service until further notice: Liwitoni, Kilindini, Manyimbo, Nyali, Mtongwe. We appreciate your patience."
"Possession of firearms at any transit facility is a federal offense."
"Upon request, all passengers are required to present their valid transit pass to Transit Authority personnel."
"Parking lot Station Plaza is prohibited."
"Passengers connecting to Orbital Shuttle Hub board westbound trains."
"Safety is everyone’s responsibility."
"Attention: inbound train."
"Welcome to Station 7: Liwitoni. Please refer to video monitors for current information."
"Children must be monitored at all times. Do not leave children unattended in station."
"Please be aware of incoming trains, and stand clear of the tracks until trains have come to a complete stop."
|
Strategies

A map of Terminal.
In CTF, it's a good idea to attempt to draw the enemy with the flag onto the tracks so you don't waste your ammo.
In a capture the flag match, it would be best if you are attacking, to jump into a Warthog (a Gauss Warthog) and get a gunner. Do not wait for other teammates to get in the passenger seat. Instead of going up the ramp, go in between the ramp, and the train wall, and take out the Wraith as quickly as possible. It does not matter if nobody is in it. Just destroy it; this will help your team a lot.
- If you are the defending team you have three priorities besides guarding the flag...
- Get the Energy Sword. Should the offensive team have it, neutralize the wielder as fast as possible and then take it for your own use. One of the reasons to do so is the Wraith. Should someone on your team be manning it, and a sword wielder sword-cancels or just swords the Wraith, the sword will glide safely right up to it and instantly be able to board the vehicle and possibly kill the driver.
- Kill the enemy rocket-man and steal the Rocket launcher. Even if the Rocket Launcher has one round left, keep it! Don't let it respawn! If you fire the last one, still hold on to it and prevent it from respawning, as doing this will slow the offense down. Give it to some one who is good with it or drives your team's Wraith.
- Keep the Wraith Tank in one piece! This is obvious; the Wraith is the ultimate vehicle based weapon platform in the map. Do not lose it! If it is destroyed, defense will be twice as hard since enemy Ghosts and Warthogs can roll right up to your base and give you hell.
- If you manage to grab the sniper rifle, you can generally stop most of an assault on your own, as you can destroy Ghosts with shots to the fuel tank, kill any driver if you are skilled enough, and kill ground troops before they even see you.
- If you are skilled enough with both the energy sword and rocket launcher or the energy sword and the sniper rifle, you may go on the offensive and take out all of the vehicle spawn protectors if there are any and take their vehicles.
- If you are on the offensive team you have a lot more to do such as:
- Drive a Warthog and cause chaos.
- Grab the Rocket Launcher. This should be obvious, Rocket(s) + Wraith = Wraith destroyed. Do not let the enemy team steal it and hog it for themselves. Most defenders are wise enough to shoot the rocket guy before any one else, so try and stick with a friend to have some cover.
- Shotgun, simple also. Charging into the enemy base with a shotgun is the best way to counter a Wraith besides disabling it. The Wraith can't normally hit you when in doors so take care of its weakness. Also, most people don't easily see the shotgun, but they do and almost always notice a sniper or rocket-wielder.
- Sniper Rifle. One or two shots to down any basic shielded foe. Until the Wraith or Overshield could be a problem. The Overshield can be taken down with a whole magazine and the Wraith will have to be taken care of by the rocket wielder in your team. But if you can snipe him out of the Wraith because the roof is blown open, do so. Make sure to get to nice cover, and move often. A good sniper can support the team incredibly for assaults against the defenders. If the defenders have the rocket launcher and/or sword, prioritize them, and make sure a teammate can get to the weapon.
- Ghost, though not impressive, drive it. Infantry will envy you and will scurry away upon seeing you rush them. You can also act as a distraction, harassing the Wraith so the Gauss Warthog or Rocket Launcher can destroy it.
- Energy Sword, if the defenders were foolish enough to leave it lying around. Take it, they'll regret their mistake soon enough. But be warned, if you are not good with it, you might get a lucky kill before some one takes you down and liberate the close range weapon from you. So give the sword to someone skilled.
- If possible and you are skilled enough with both the energy sword and rocket launcher or the energy sword and the sniper rifle can be a lethal combo for the offensive team since you can attack from short, medium, and long range or protect the vehicles or take out any stolen vehicles (easiest with the rocket launcher).
An excellent game mode to try is slayer with Brute Shots and Carbines. The map has an excellent variety of open ground and elaborate buildings that are excellent for such a game style. While I do not suggest the Wraith, Ghosts provide an interesting touch.
Development
Terminal was designed by Chris Carney (who was inspired by the SkyTrain in Wikipedia:Vancouver), and the artist for the map was Mike Zak. Robert McLees provided the fictional transit map for this map.[2]
Jaime Griesemer had come up with two ideas that became the central design elements of the map: a vehicle focused, asymmetrical 4v4 map, and a map where the flag return would be contested.[2]
Early on, the Rocket Launcher was replaced with a Banshee to counter the Wraith. However, the Rocket Launcher was eventually brought back.[2]
In the early design of Terminal, the light rail train was originally going to be engulfed in flames and people screaming could be heard from the inside as it passed by. The flames were later removed, probably because it was assumed to be too harsh, even for a multiplayer map. The screaming of panicked passengers can still sometimes be heard if you are attentive, as well as the conductor sounding the horn of the train, although much easier to hear. It can be heard in the "Passengers connecting to Orbital Shuttle Hub board westbound trains" file from here.
Many of the assets, such as the windows and building designs, created for the campaign level Metropolis were finally used in this level because Bungie ran out of time during the development of the campaign.[citation needed]
Trivia
- The storm above the map has a resemblance to The Storm of Halo 3.
- There is a way to glitch yourself out of the map using the energy sword glitch and a Wraith/Warthog, making the skyscrapers and ledges fully accessible. You can also see a hidden area behind one of the stations, although this area is, as of yet unconfirmed, unreachable.
- Sometimes if the train smashes a Warthog, the turret will face the other direction.
- There are two UNSC recruiting posters on this level.
- All the phone booths in this level are booth number 7.
- If you get hit by a train, it is an instant death, even when inside a vehicle.
- If you do get hit by a train it will say "Killed by the Guardians."
- Just one of the glass panels can stop a Sniper round, which will normally go through infantry armor without a problem.
- A Tri-gate can be found outside the map.
- Strangely, If the booth in the parking lot is shot with a gauss cannon, Elite blood will appear yet will disappear in a while.
- There is a Sniper spot above the parking garage. You can get up there by putting a Scorpion on the map (not recommended because it would take a LONG time to get the Scorpion in the garage). Go into the garage and jump on the Scorpion, or another player. This is also a possible spawn point.
- By parking a Warthog underneath the tracks and leaving, enemies may attempt to get in the Warthog, only to be hit by the over-passing train.
- The train is strong enough to smash all kinds of vehicles on the map, including Scorpions and Wraiths.
- If you time it right you can get the warthog going full speed and the train will hit the back end of it, putting you in a very fast spin without killing you.
- Picking up the Overshield for invincibility while it still charges up and then getting hit by the train will result in you getting sent flying quite a distance.
- There is an ad for the gold-colored Civilian Warthog in the map, just like on Headlong and Turf.
- It is also possible to survive being hit by the train by jumping and grazing its top edge as it passes. This will cause the player to be launched into the air, draining their shields but not killing them.
- Terminal is used as the setting of a popular machinima called "Frequency," by the popular Hollywood Halo.
- The train is indestructible, nothing can destroy it, not even a Scorpion.
- The train can disappear by lag but will come back when scripted.
- The dumpster near the Wraith will disappear in CTF.
Videos
")
Gallery
")
Sources