Template:Ratings
Reclaim the city. Make a hole.
|
The Storm[1] is the fourth campaign mission of Halo 3. Upon completing it on the Normal, Heroic, or Legendary difficulties, the player will earn the "Assault" achievement and 30 Gamerpoints. Upon earning 15,000 points in metagame scoring on this level, the player will earn the Askar achievement and 10 Gamerpoints.
Background

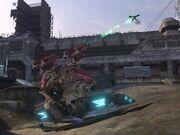
A Type-52 Anti Aircraft Artillery fires on a Hornet.
It begins with a UNSC Warthog convoy moving to Voi, whose objective is to punch through the Covenant Loyalist Anti-Aircraft defenses that surround the Ark and allow Lord Hood's small fleet of ships passage to the Prophet of Truth's fleet. UNSC Marine forces, led by SPARTAN-117 get involved in several pitched skirmishes as they must fight through the industrial zone of Voi, through warehouses and factories and having to survive ambushes by both Covenant foot soldiers and Covenant armor.

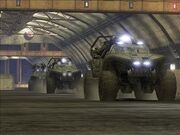
A UNSC Warthog convoy en route to the Traxus Factory Complex 09.
After breaking through the industrial area Master Chief, meets up with a brigade of approximately 6 Mongoose ATVs and commandeers one with a Marine riding 'shotgun' using a M41 Rocket Launcher. They immediately engage a squadron of Anti-Air Wraith tanks to secure a landing zone as Brutes on Brute Choppers and Grunts on Ghosts attack them and are constantly reinforced by Phantoms. Above them are Hornets and Banshees, having a dogfight for control. Although they manage to take the landing zone, the victory ends up being short lived as a Scarab arrives to crush the UNSC forces. After disabling it by boarding it, then destroying its power core the UNSC forces prepare to push into a Brute controlled warehouse.
With reinforcements led by The Arbiter and Sergeant Johnson along with volunteer civilians from a nearby factory, they push onwards, engaging nearly a dozen Brutes armed with Spikers and Brute Shots, a pair of Hunters and a Brute Chieftain wielding a Gravity Hammer. After that, they press on to the site, engaging a small Covenant force defending it. Eventually they punch through, disabling the gun, allowing the UNSC Navy, along with Miranda Keyes, free rein. [2]
Starting Weapons
| Player V Starting Point > |
Mission Start | Rally Point Alpha |
| Master Chief Primary Weapon Solo |
MA5C Assault Rifle | M41 SSR MAV/AW Rocket Launcher |
| Master Chief Secondary Weapon Solo |
M6G Magnum | BR55HB SR Battle Rifle |
| Master Chief Primary Weapon Co-op |
MA5C Assault Rifle | M41 SSR MAV/AW Rocket Launcher |
| Master Chief Secondary Weapon Co-op |
M6G Magnum | BR55HB SR Battle Rifle |
| Arbiter Primary Weapon | Type-51 Carbine | Type-33 Light Anti-Armor Weapon |
| Arbiter Secondary Weapon | Type-25 Directed Energy Rifle | Type-51 Carbine |
| N'tho 'Sraom Primary Weapon | ||
| N'tho 'Sraom Secondary Weapon | ||
| Usze 'Taham Primary Weapon | ||
| Usze 'Taham Secondary Weapon |
Transcript
Ghost Town
Military Operations Urban Terrain.
{Gameplay}
A convoy of three Warthogs: two M831 TT Warthogs and one M12 Warthog LRV, rolls down a tunnel of Tsavo Highway, with the Chief riding shotgun in the LRV. (On co-op, the Arbiter and the other Elite(s) ride shotgun on the TT's).
- Commander Keyes (COM): "Chief, the Prophet of Truth has found the Ark. Our only chance of stopping him is a surprise aerial assault. Clear this sector of Covenant anti-air defenses. Make a hole for the Admiral’s ships. Good hunting. Keyes out."
The Warthogs emerge from the tunnel in a parking lot scattered with destroyed Warthog chassis and Marine and Grunt corpses. The Warthogs roll to a pause as the Marines and Master Chief walk out, and the Marines form a perimeter outside the locked door.
- Marine Sergeant (Reynolds): "Ready when you are, Chief. Open the door and take point. We’ll cover you with the .50."
or
- Marine Sergeant (Stacker): "Ready when you are, Chief. Open the door, take point; we'll cover you with the .50!"
The Master Chief opens the door into an empty factory section and then into a next section with Covenant. An M12 Warthog LRV and a file of Marines follow him in.
- Prophet of Truth (Pedestal): "With my gentle encouragement, our lords' holy relic springs to life. It is unfortunate that our enemies also bear witness to its glory. But soon their dull eyes will be closed; seared by the Rings unforgiving might."
- Marine Sergeant: "Chief, open the door; we can roll on through!"
A set of doors is opened, leading to a factory tunnel laden with Brutes, Jackals, Grunts, and even a pair of Ghosts. Beyond that is another door that leads to Lake Bed A. After cleansing the tunnel, the UNSC forces open the next door, revealing a massive expanse with cruising Ghosts and a heavy Covenant garrison.
- Lord Hood (COM): "Kilo 23, this is Forward Unto Dawn. I need a sit-rep, Commander."
- Commander Keyes (COM): "Atmospheric disturbances intensifying above the artifact, Admiral."
- Lord Hood (COM): "And Sierra 117?"
- Miranda Keyes (COM): "Moving as fast as he can sir. I know he’ll get it done."
A Phantom deploys a standard Wraith at the far side of the lake bed.
After the Anti-Aircraft Wraith in the nearby area is destroyed.
- Hocus (COM): "Hell yeah! Boom! The Fly Boys are gonna love us for that!"
- Sergeant Johnson (COM): "Thataway, Chief! Target destroyed. Move to the next area, over."
Master Chief and the remaining Marines exit the lake bed into the confines of the factory again, where a Brute Chieftain and his attendant Brutes, Jackals, and Grunts have a pair of Marines pinned down in the adjacent section.
- Marine: "They just keep coming!"
- Female Marine: "Check your fire! It’s the Chief! Flush ‘em out, sir. We'll nail them with the .50."
After the Chieftain and his troops are killed by the Chief and Marines.
- Marine: "We’ve made a hole. Hurry, before any more Covenant show up!"
The Marines defending the warehouse open the door. The Chief and accompanying Marines head through.
- Female Marine: "We're down to our last mags, sir. 'Thought those last ones had us."
- Marine: "Covenant Phantom! Overhead!"
A Phantom hovering overhead above a shattered glass roof frightens the Marines a little.. The Master Chief and Marines quickly move to the next section as the glass roof explodes in shattering sound and a horde of Drones descend. Eventually they are fought off and the Master Chief and Marines enter the next factory tunnel section.
- Cortana (Cortana Moment): "I have defied Gods and Demons..."
At the end of the tunnel are four Mongeese next to a rack of weapons. Marines rush to man the ATVs.
- Female Marine: "Mount up! Rockets in back! Move fast and punch hard!"
The Marines open the tunnel door. The Chief takes a Mongoose {or can take any other vehicle of choice} and joins the Marines on the assault of the Anti-Air Wraiths in the neighboring lake bed. While a small squad of Marines are pinned down on the "boardwalk" on the northern side of the lake bed, Covenant vehicles mill in the center.
- Sergeant Johnson (COM): "We’ve got anti-air Wraiths in the next lake bed, Chief!"
The ATVs quickly take out the first Anti-Air.
- Marine: "One down, one to go!"
A few Choppers along with Phantoms carrying Ghosts overwhelm the lake bed with Banshees above. They take out the Second Anti-Air Wraith. The ATVs, Hornets, and Mounted Missile Launchers eventually clear the lake bed of Covenant armor resistance.
- Sergeant Johnson (COM): "Both AA Wraiths have been neutralized...standby. Something Big closing in on your location."
Judgment
Scarab. BFG. End of the World.
There is the booming of the anti-aircraft emplacement in the distance, but also an ominous mechanical grinding noise.
- Marine (COM): "What’s that sound?"
The booms and grinding get louder.
- Marine (COM): "It’s getting closer!"
- Sergeant Johnson (COM): "Scarab! Find some cover, now!"
A massive Scarab walker lumbers down from the roof of the factory onto the lake bed, and dust rises as its legs slam into the ground. Marine vehicles and a pair of Marine-manned Missile Pod turrets open up in volleys.
- Marine: "Use rockets! Target its joints!"
If the Chief waits around.
- Sergeant Johnson (COM): "Its Armor's too thick" or "Aim for its legs, Chief"
The Chief, Marines and Missile Emplacements eventually take out one of it's joints, forcing it to lower and consume all power into getting back up again, deactivating it's primary weapon.
- Marine : "Now while it's down! Find a way inside!"
Once the Chief boards the Scarab.
- Sergeant Johnson (COM): "Look for something big... power core something like that"
On the upper deck of the Scarab, several Brutes, Jackals and Grunts await the Chief, and forcing the Chief to kill anyone in his path.
If the Chief stays on the Scarab for quite sometime..
- Sergeant Johnson (COM): "Look for the core Chief. You'll know it when you see it"
When the Chief finally finds and blows up the power core.
- Marine (COM): "GET AWAY! It's Gonna Blow!"
The Chief jumps off the Scarab and runs for it. The Scarab finally detonates.
- Miranda Keyes (COM): "Well done, Chief! I’m sending in a few Pelicans."
- Sergeant Johnson (COM): "One more target, Chief. There’s an AA gun in the next area. Take it down and Lord Hood can start his attack run."
A Pelican lands, deploying the Arbiter. The surviving Marines lead the Arbiter and Master Chief to a locked door leading to the factory's warehouse.
- Arbiter: "There was honor in our Covenant once, and there shall be again!"
- Female Marine: "We've got this area locked down, sir. Follow us, we’ll get you through."
The door opens up, leading to a dirty tin-walled section filled with wounded Marines and civilians laying on the floor and several grim-faced Marines behind sandbags, tending to the wounded, and operating the sole UNSC field radio.
- Cortana (Cortana Moment): "I am your shield...I am your sword."
- Wounded Marine: "Ahh! Ahhhh-ahhhh-get me some morphine!"
Voices begin to play through the radio and are attentively monitored by a pair of Marines operating it.
- Naval Officer (COM): "All Brute cruisers are pulling back to Truth’s ship. Winds inside the storm just hit 200 kilometers per hour. Energy cascades all over the artifact!"
There is a moderate pause within the radio conversation.
- Miranda Keyes (COM): "Admiral, a Covenant ship has slipped in-system!"
- Lord Hood (COM): "Just one? What is its range and position?"
- Miranda Keyes (COM): "Above the artifact, inside the orbital line. Seems to be holding steady."
- Lord Hood (COM): "Attack will proceed as planned, Commander. We’re not going to get another shot at Truth."
- Miranda Keyes (COM): "Sir. Yes sir."
The Master Chief and the Arbiter pass through a stained area of bolted tin plates until they reach the periphery of the warehouse: a trio of Marines are pinned down under sandbags as Spiker projectiles fly through the air. Further forward is a steel bridge where a pair of Marines frantically open fire on Brutes all around them with a turreted Heavy Machine Gun.
- Marine: "We’ve got company!"
After the Brutes between the sandbags and the bridge are killed by the UNSC force, another group of Brutes charges from the next section, chasing a Marine. They then run towards the bridge and a Marine fires the bridge-mounted turret.
- Marine: "Hold the line! Enemy charging!"
- Arbiter: "Be careful!"
After the next wave of charging Brutes are killed.
Master Chief, the Arbiter, and surviving Marines make their way into the next section, where behind a mass of stacked crates a Brute violently throttles a construction worker Three other workers armed with pistols flee from the Brute and his other Brute companions. The throttling Brute roars out.
- Throttling Brute: "Kill them for the honor!"
- Construction Worker: "Get to safety!"
After the current group of Brutes is killed.
The next section is empty and has an open door leading to the outside of the factory; the anti-aircraft emplacement is nearby. The door is opening up, and a group of four construction workers runs in. However, they are cut down by two massive green beams of energy fired from the nearby Fusion Cores: a pair of Hunters appear.
- Construction Workers: "Ah-AHHHH!"
- Construction Workers: "I'm a cowardly fool!"
- Construction Workers: "Help me help you!"
The Hunters charge in over the worker corpses and charges the Master Chief, the Arbiter, and the awaiting Marines. {If the fight continues for a while...}
- Marine Sergeant: "Gotta get around ‘em, Chief! Look for gaps in their armor!"
After the two Hunters are killed.
The Marines, Master Chief, and the Arbiter go beyond the Hunter corpses and the open door to a series of low-roofed buildings where a Brute Chieftain awaits with numerous other Brutes, Jackals, and Grunts. The Prophet of Truth sermonizes from a holographic pedestal behind them
- Prophet of Truth (Pedestal): "Take heart, my brothers! Only our enemies should fear this raging storm."
The Assault Force finally defeats the Covenant Defenders and continues on ahead.
- Prophet of Truth (Pedestal): "Darkened Skies And Lashing Fire are all that remains for them when we the worthy have passed to the beyond."
- Arbiter (Upon seeing the Prophet of Truth's pedestal): "I will not be shamed. Not again! Not by you!"
The Chief, Arbiter, and remaining Marines charge around the remaining buildings to the hill where the massive anti-aircraft emplacement stands. Before the hill's slope is a Marine, a Surface-to-Air Missile Launcher and a few corpses behind sandbags and a weapons rack. Grunts tentatively run down the slope to face the onrushing UNSC forces while mid-way in the hill, a Grunt manning a turreted plasma cannon stands side-by-side to a Brute Chieftain and his captains and bodyguards. The emplacement opens fire on a surging UNSC Longsword, destroying it and catching it on fire as the wreck soars into the cliffs below.
- Commander Keyes (COM): "Chief! Hood's ships are closing fast! Destroy that gun; we’re out of time."
The Chief, Arbiter, and all Marines and Civilians push up the hill, taking down all Covenant defense.
- Sergeant Johnson (COM): "Chief, that gun’s been firing non-stop: it’s gotta be running hot! It’s gonna be opening up its access panel!"
The anti-aircraft emplacement's lower section opens to reveal a white sphere. Steam vents as the panel continually opens. The Master Chief destroys the sphere with the Arbiter, Marines, and workers, and the top section of the gun billows in blue fire and falls off: the emplacement has been destroyed, and Lord Hood's naval strike force has a clear shot at Truth and his fleet above the artifact.
{Cut-scene}
The AA Gun explodes, sending the weapon on top flying down the cliff. The Master Chief and Arbiter stand on the cliff side of the crater on the hill of the recently destroyed anti-aircraft emplacement. Multiple squadrons of Longswords streak overhead, followed by three UNSC Frigates, including the UNSC Forward Unto Dawn, Lord Hood's flagship. Lord Hood's attack begins. The Covenant fleet is hovering before them, with the Forerunner Dreadnought centered below them at the center of the Portal.
Lord Hood (COM): "All ships, fire at will!"
The UNSC frigates engage the Forerunner Dreadnought, Magnetic Accelerator Cannons discharging in volleys, and explosions ripple on the dreadnought's surface. The Forerunner structure begins to open like a starfish, focusing energy on the Dreadnought, and fires off a beam of light. Everything soon blacks out.
Cortana (Cortana Moment): "This is the way the world ends..."
A large glowing sphere of Blue light soon appears, centered by pitch darkness has appeared in the sky above the artifact, and the vessels of both the UNSC and Brute fleets are drifting in the air, disorganized.
Lord Hood (COM): *coughs* What did Truth just do?! *coughs* *coughs* Did he activate the rings?!
Miranda Keyes (COM): "No, sir. But he certainly did something."
The Arbiter roars loudly as the Forerunner Dreadnought rises into the sphere, followed in close order by the Covenant fleet.
Lord Hood (COM): "Evac wounded and regroup. Wherever Truth went-"
Naval Officer (COM): "Sir, new contact slipping in."
A CCS-class Battle cruiser emerges from Slip space to the east of Voi, and hurtles just overhead the Arbiter and Chief. It is smoking with rancid fumes and is distraught. The air takes on a darkened appearance, and smog rises, veiling the Sun.
Arbiter: "What is it? More Brutes?"
Master Chief: "Worse."
Walkthrough
Welcome to Voi, the last level on Earth fighting the Covenant.
At the start of the level you are riding on a Warthog. Just wait for the ride to end and you'll jump off. Hit the switch, swap a Marine for a BR if you want or you can duel wield pistols, and go in. A quick option is to go near the gate to the right, look up, and open the switch, or get up the stairs to pick off Grunts and jackals. When you go up the stairs (the room with the breakable glass), turn around. There should be a room with a Battle Rifle, Grenades, and Magnums. Either way, open the first gate to let the Warthog through. Kill the enemies, and open the second one. Quickly get on the Warthog and ram through the line of Jackals, and formation of Grunts, and making way for the gunner to take care of Brutes. Get off, and get in a Ghost don't forget to open the door.) Storm off, running over the enemies down the concrete path. Make a right to the place a Phantom is attacking Marines. User your Battle Rifle to take them out and go up the stairs and grab a Sniper; use it to take out the gunners of both the AA Wraith and the Wraith a Phantom drops off. Without them, the vehicles have no way to really deal with close combat. Then hijack the AA Wraith and use the missile pod to destroy the Wraith further away there is Assault Rifle or Battle Rifle ammo under the stairs if you're low on ammo. It is possible to take down the Phantom with the missile pod so that its wreckage blocks the Wraith underneath it. Blast through the interior behind the destroyed Wraith with your Battle Rifle blazing. After the enemies are dead, go up the stairs to confront Brutes and Grunts. Don't worry, there are 2 sets of stairs up to the area (one in front of you, another in a doorway to the left)so you can go up both back and forth, using over charged plasma pistol blasts (or a Power Drainer) and Grenades to kill who ever is up there.
Once up there (make sure you have a Battle Rifle with you) go through the doorway and detach the turret and go through the same exact doorway to pick off the Drones (though you can always run past, opening the next gate to the 6 Mongooses.) A rocket round to the main bulk of the Drones (which comes in 2 waves) is also extremely effective. And which ever way you choose, grab a Rocket Launcher for the next skirmish. You can drive the Warthog in this level if you saved it from before, occasionally your Marine buddies will disappear at the next checkpoint.
Here you have to drive a Mongoose through a giant mess of Brutes and grunts guarding 2 AA Tanks and Phantoms who will drop down even more enemies. Please note there are ground infantry in the middle of the battle ground and the area with Missile Pods. Did you see that area and the right crane? They aren't just tactical points for combating Scarabs. Use the Missile Pods to take down Phantoms and vehicles; the crane as a sniper tower (there is a Sniper up there.) There is also the strategy of driving around, letting your rocket passenger do his stuff but that will just get you blasted to hell over and over. At any given time there could be nearly 40 AI's running around and endless possibilities to handle the situation(You should take a Chopper and use that instead.). Pick your own to take down the AA Wraiths but just remember: it's not over yet. You may still have your original Warthog, with a rocket launcher ally and gunner aboard is extremely effective in this new area. There is a Troop Hog upside down near the Missile Pod marines, if you have the time you can use this and load it up with 4 rocket launcher Marines.
By now the Scarab has climbed over, shooting everybody. Like I said, endless possibilities. Use the strategy Johnson gave you and take out its legs and hop on. I, on the other hand, use the missile pod to take it out its legs, destroying the back plating, leaving the core wide open. Anyway, destroy the Scarab to see that great lighting to use and go back to where all your Marines are, the Arbiter will be there to. After listening to Cortana go through the little hallways with a Sniper, Rocket, and a Machine Gun Turret. Or you can have Rocket, sniper, and missile pod. This place is very straight forward so just rip through Brutes with the turret and snipe them from afar, NOT using any Rocket launcher ammo. Or you can blast them to hell with the missile pod (don't miss). Continue through the warehouses to an opening garage, rocket launcher at hand. 2 Hunters will run charge through, and you have the pleasure of blasting them apart. Kill the chieftain with the rocket launcher (don't worry he doesn't even move and also don't get too close). You should still have sniper, rocket, and a invincibility or deployable cover. Take this opportunity to upgrade your Allies weapons with Snipers, Rockets and mid-range weapons (BR and Carbine).
This is it, the final Covenant confrontation on Earth you will play a part in: the assault on the Anti-Air Gun. Scout the perimeter of your battlefield: Banshees in the sky (those won't pose much of a threat), the B.A.M.G to the left with another sniper, a turret (a Marine or the Arbiter will get on, provided you don't rip it off), a road up the hill and the giant gun shooting into the sky, the only thing in the way of the Frigate's path. Go to the left and snipe the chieftain with the fuel rod. Use your deployable cover and shoot through it. Next snipe the jackals and the turret grunt, as the other brutes would have already left. Rip off the turret to your right and kill everyone. Then rip off the plasma turret and kill the rest. A few rockets/grenades will destroy the AA gun.
Alternatively as soon as you reach the area where you can see the gun next to a building, look to your left if you are looking at the AA Gun. On the AA Gun side of that missile launcher is a sniper Rifle. Pick it up and aim at the white sphere that comes down when it fires. You should be able to at least hit it at least 3 times before it goes back up, when it does, just reload. When it's destroyed you win without much work.
Trivia
- Despite entering the city from the South-Eastern edge, the turn off to Arusha is on your right, while in reality the city of Arusha is on the other side of Kilimanjaro with respect to Voi. This would logically place the turn off on your left.
- It is possible to fly a dumpster on this mission by getting a second player and have them both jump rapidly to make the dumpster ascend. It is possible to steer if both players jump in the same direction.
- The Surface-to-Air Missile Launcher from the High Ground multi player level can be seen close by the Covenant Anti-Aircraft gun.
- During this level one of the wounded marines is voiced by TV personality Jonathan Ross.
- The boat on the part with the Scarab looks like Master Chief's helmet.
- If you manage to get into the boat either in theater or somehow in actual game play there is a blurry picture with a picture of a pirate with writing under it in Swahili that says "Pimps at Sea", an April Fools Day joke that Bungie made up.
- The last portion of the level is called "Scarab/BFG/End of the World" in the level select. The BFG is a weapon in the Doom games, and is short for "Big F*****g Gun." The BFG is also the title of a children's novel by Roald Dahl, in this instance BFG stood for "Big Friendly Giant." It also parodies the rapid firing Area 51 weapon the BBG which parodies the anti-air turret of the Scarab.[citation needed]
- The last cutscene of the level has clear resemblance to the Halo 3 Announcement trailer, right down to the music.
- If you look at the name of the UNSC frigates firing on the Forerunner Dreadnought they all say Forward Unto Dawn and the ships number are the same as well.
- In the part where you have to face the Hunters in that garage-looking area if you go to the right of the door there is a passage way that is the same passage way that you go into after your first encounter with the Flood in Floodgate (Level) and at the very end of the passage way the is a dead worker with a sniper rifle laying right beside him.
- It is possible to save the workers running away from the Hunters by quickly shooting the fusion coils next to the opening garage door, that way the Hunters won't shoot them to kill your allies. Note: If you are too slow then you will kill your allies and lose countless points.
- It is the last level with the Covenant on Earth, and the first Voi mission and the fourth African city mission.
- If you shoot the driver out of a Hornet it will automatically blow up.
- If you enter Theater Mode or shoot down any Phantoms with the Missile Pod and glance at either Grunt on the Plasma Cannons, they are actually wielding Spikers.


Grunt holding Brute Spiker
- There is another possible, although unorthodox, method to get on the Scarab's back: use a small vehicle (Mongoose or Ghost), get it on the elevator of one of the two crane structures, activate the elevator, and if you can time things right, you can drive down the end of the crane and land on the Scarab's back (at that point: get off the vehicle).
- When you first meet the Hunters they will always attack the fusion cores. If you are quick enough and get close enough they will melee you but then attack the fusion cores. It is unknown why this happens.
- At lake bed B if you manage to get on top of the level (see-http://uk.youtube.com/watch?v=3VyhlvGYSNQ) if you continue forward and look at the Covenant AA gun there will be a second one but it will just be the legs of it, no cannon at all.
- The easiest way to destroy the Anti-Aircraft Battery mechanism is to take dual plasma pistols and shoot overcharged blasts at the generator of the Anti-Air Gun one after the other. The generator should deteriorate fast.
- In co-op, it is possible to get a Wraith of any kind through into the second lake bed. To do this, one player must be in the Wraith. The other player melees the frontal "wings" off the Wraith. When you have done this, the Wraith should just fit through the door.
- If you use a power drain or an over-charged plasma pistol shot, you can take down a hornet but you can not fly it or use the passenger seats. If you do this while fighting the scarab you can stand on top of the hornet and jump on to the scarab after the hornet can fly again and gets close enough to the scarab.
- The Banshees at the anti-air defense guns fly around for no reason. They can be shot down for some points. But sometimes one or two will shoot at you for a second. If you manage to catch one in a Power Drainer, or use a Plasma Pistol on one of them, they can be boarded and you can fly around the place. The player will, however, die if they pass beyond the map borders.
- There is a "Missing Jason Jones" poster at the beginning of the level. When you get on top of the first ramp, run directly to your left. It will be there under some ropes. For some strange reason, it won't be there in co-op.
- Its the only level that has usable Missile Pods on turrets in the Halo trilogy, unlike in multi player.
- In the warehouse the workers may say "Help me help you" and "I'm a cowardly fool!" which were also said by the crewmen on the first level of Halo: Combat Evolved.
- This is the only level in the trilogy that features real civilians. Even though the crewmen aren't real soldiers, they still work for the UNSC. They have Pistols as standard but can fire any weapon that a Marine can handle. A rare glitch occurs where you can exchange a Gravity Hammer with a dockworker (though they cannot use it in battle).
- This level along with "Tsavo Highway" and "The Covenant" are the only campaign levels with a drivable troop transport Warthog.
- There is a glitch that allows you to completely remove the Arbiter from the level. To do this, you must simply move into the warehouse immediately after destroying the Scarab, and trigger the 'Cortana Moment' before the Arbiter can disembark the Pelican. Obviously, this only works in Single Player mode.
- Using a grav lift, it is possible to leap up onto one of the Scarab's legs, and from there to its body.
- The city of New Mombasa is visible across the excavation site (zoom is recommended).
- Voi is near Standoff and High Ground you can tell because you can see the communications tower from both of those levels.
- When you get to the area where the AA guns destroy the Longsword, if you have a Battle Rifle, or even better, a Carbine or Sniper Rifle, you can destroy the AA gun without killing the brutes in the area. If you zoom in, you should be able to see a very small fraction of the gun's plasma core showing. Sustained fire should destroy it and end the level, even when there are Brutes and Grunts at the AA gun. They will not show in the cut-scene.
- There is a Marine corpse under the broken bridge in the beginning of the level.
- A useful tactic for taking down the scarab is to bring the troop-transport warthog throughout the buildings and fill it with four of the rocket-armed Marines. Simply stay in cover until the scarab arrives, and then park underneath it, The Marines will do the rest.

.jpg)
References
- ↑ EGM Magazine, August 2007, page 62
- ↑ http://www.1up.com/do/previewPage?cId=3162238
Images
")
")
")
")
")
")
| Preceded by Tsavo Highway |
Halo 3 Campaign Missions The Storm |
Succeeded by Floodgate |